


Reflex is a Python web framework that allows you to build full-stack applications with Python.
Using Reflex, you can build frontend and backend applications using Python to manage the interaction between the frontend UI and the state with the server-side logic. To make the application data-driven, you can connect to a Neon Postgres database.
To connect to Neon from a Reflex application:
Create a Neon project
If you do not have one already, create a Neon project. Save your connection details including your password. They are required when defining connection settings.
To create a Neon project:
- Navigate to the Projects page in the Neon Console.
- Click New Project.
- Specify your project settings and click Create Project.
Set up a Reflex project
To set up a Reflex project, you need to install the Reflex CLI and create a new project.
Create the project directory
Create a new directory for your Reflex project and navigate to it:
mkdir with_reflex
cd with_reflex
Create a virtual environment
It's recommended to use a virtual environment to manage your project dependencies. In this example,
venvis used to create a virtual environment. You can use any other virtual environment manager of your choice likepoetry,pipenv, oruv.To create a virtual environment, run the following command in your project directory:
python3 -m venv .venv
source .venv/bin/activate
Install the required packages
Install Reflex,
python-dotenvto manage environment variables, andpsycopg2-binaryto connect to Neon Postgres:pip install reflex python-dotenv psycopg2-binaryTo initialize the Reflex app, run the following command:
reflex initWhen prompted choose: A blank Reflex app (option 1). You should see output similar to the following:
$ reflex init
──────────────────────────────────────────── Initializing with_reflex ─────────────────────────────────────────────
[07:20:37] Initializing the web directory.                                                             console.py:231

Get started with a template:
(0) Try our free AI builder.
(1) A blank Reflex app.
(2) Premade templates built by the Reflex team.
Which template would you like to use? (0): 1
[07:20:39] Initializing the app directory.                                                             console.py:231
Success: Initialized with_reflex using the blank template.
When the project is initialized, Reflex CLI creates a project directory. This directory will contain the following files and directories:
with_reflex
├── .web
├── assets
├── with_reflex
│   ├── __init__.py
│   └── with_reflex.py
└── rxconfig.py
The
rxconfig.pyfile contains the project configuration settings. This is where the database connection settings will be defined.Configure Reflex connection settings
Now that you have set up a Reflex project, you can configure the connection settings to connect to Neon.
Create a .env file
Create a
.envfile in the root of your project directory to store your Neon connection string. Add the following line to the.envfile, replacing the placeholder values with your actual Neon connection details:DATABASE_URL="postgresql://<user>:<password>@<endpoint_hostname>.neon.tech:<port>/<dbname>?sslmode=require&channel_binding=require"You can find the connection string for your database by clicking the Connect button on your Project Dashboard in the Neon Console. For more information, see Connect from any application.
Update the rxconfig.py file
-
Open the
rxconfig.pyfile in the project directory. -
Update the file to load the environment variables from the
.envfile and set thedb_urlparameter with theDATABASE_URLenvironment variable:import os from dotenv import load_dotenv import reflex as rx load_dotenv() config = rx.Config( app_name="with_reflex", plugins=[ rx.plugins.SitemapPlugin(), rx.plugins.TailwindV4Plugin(), ], db_url=os.environ.get("DATABASE_URL") ) -
Save the changes to the
rxconfig.pyfile.Now, you can run the Reflex app and start building your Python full-stack application with Reflex and Neon.
-
Creating a data model
To create a data model in Reflex, you can define a Python class that represents the data structure. Reflex uses sqlmodel to provide a built-in ORM wrapping SQLAlchemy.
Add the following code to
with_reflex/with_reflex.pyto create aCustomermodel:"""Welcome to Reflex! This file outlines the steps to create a basic app.""" import reflex as rx from rxconfig import config class Customer(rx.Model, table=True): """The customer model.""" name: str email: str phone: str address: str class State(rx.State): """The app state.""" def index() -> rx.Component: # Welcome Page (Index) return rx.container( rx.color_mode.button(position="top-right"), rx.vstack( rx.heading("Welcome to Reflex!", size="9"), rx.text( "Get started by editing ", rx.code(f"{config.app_name}/{config.app_name}.py"), size="5", ), rx.link( rx.button("Check out our docs!"), href="https://reflex.dev/docs/getting-started/introduction/", is_external=True, ), spacing="5", justify="center", min_height="85vh", ), ) app = rx.App() app.add_page(index)This code defines a
Customermodel with fields forname,email,phone, andaddress. Thetable=Trueargument tells Reflex to create a table in the database for this class.Generate the Alembic migration files
Reflex uses Alembic to manage database migrations. To generate the Alembic migration files, run the following command in your project directory:
reflex db initCreate and apply the migration
Run the following command to create a new migration file that reflects the changes made to the data model:
reflex db makemigrations --message 'create customer model'After creating the migration file, apply the migration to the database by running:
reflex db migrateThis command applies the migration to the database, updating the schema to match the model definition.
You can verify that the
customertable has been created in your Neon database by visiting the Tables section in the Neon Console.Create the Reflex app
Update the
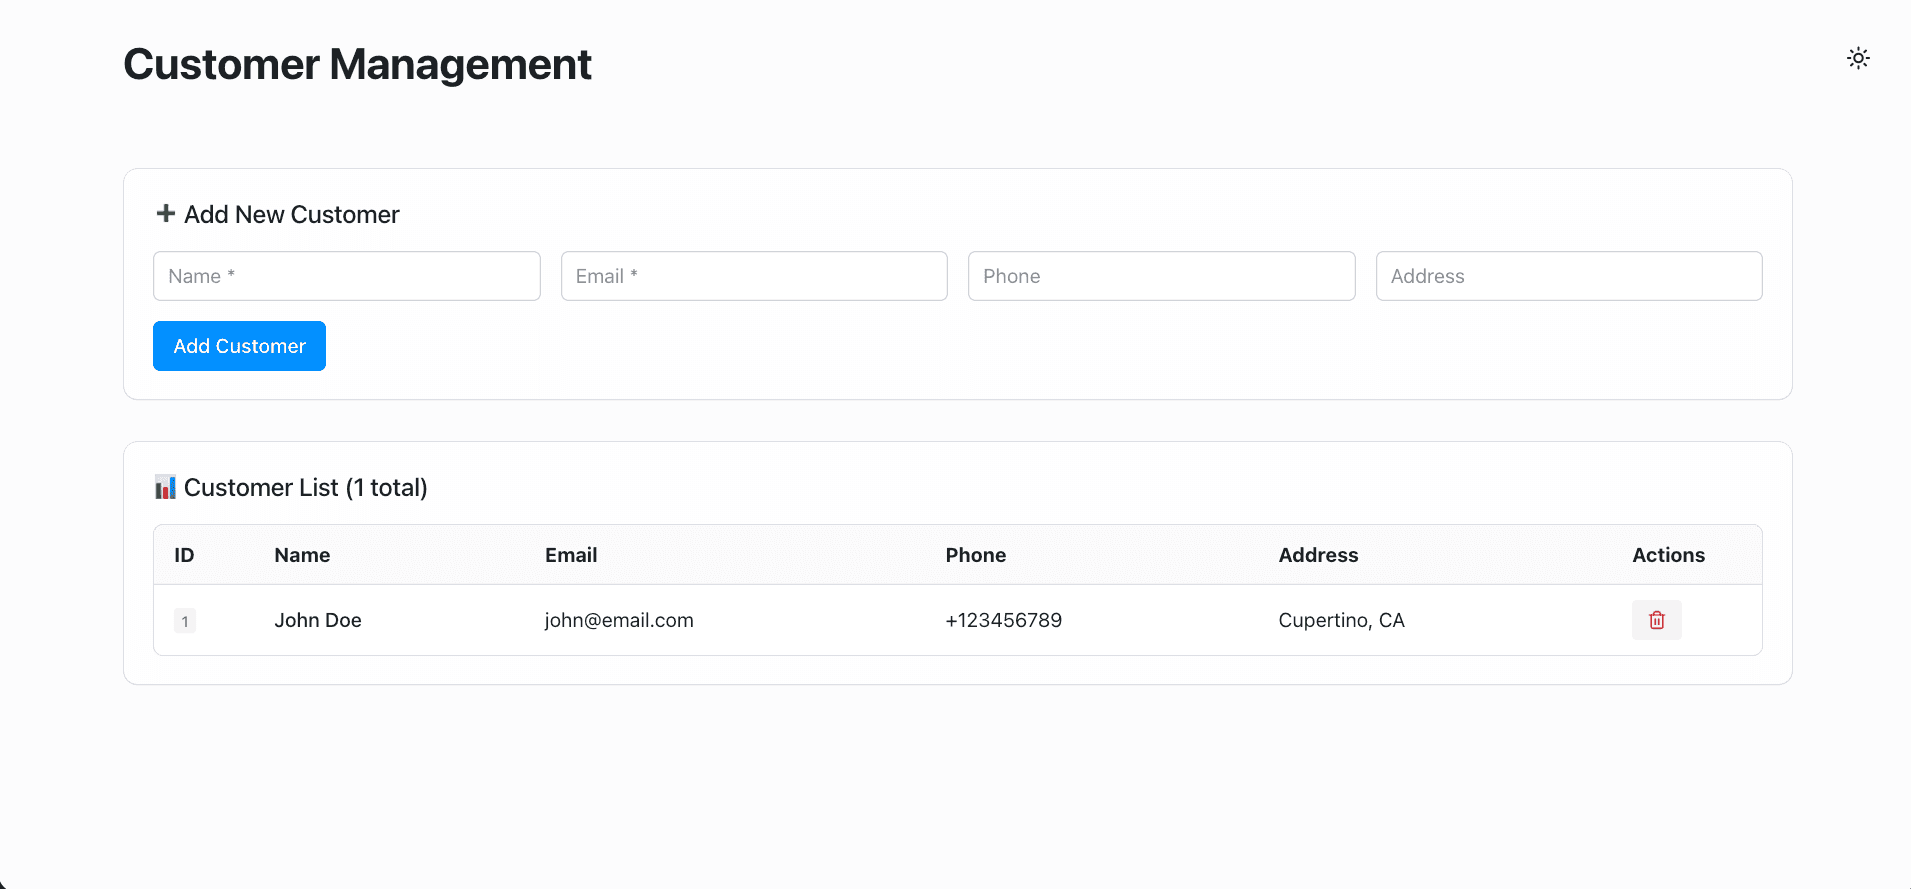
with_reflex/with_reflex.pyfile to create a simple Customer Data App that allows you to add and view customer records."""Welcome to Reflex! This file outlines the steps to create a basic app.""" import reflex as rx from rxconfig import config class Customer(rx.Model, table=True): """The customer model.""" name: str email: str phone: str address: str class State(rx.State): """The app state.""" # Form fields name: str = "" email: str = "" phone: str = "" address: str = "" # List of customers customers: list[Customer] = [] def load_customers(self): """Load all customers from the database.""" with rx.session() as session: self.customers = session.exec(Customer.select()).all() def add_customer(self): """Add a new customer to the database.""" if self.name and self.email: with rx.session() as session: customer = Customer( name=self.name, email=self.email, phone=self.phone, address=self.address, ) session.add(customer) session.commit() # Clear form fields self.name = "" self.email = "" self.phone = "" self.address = "" # Reload customers self.load_customers() def delete_customer(self, customer_id: int): """Delete a customer from the database.""" with rx.session() as session: customer = session.get(Customer, customer_id) if customer: session.delete(customer) session.commit() # Reload customers self.load_customers() def index() -> rx.Component: return rx.box( rx.color_mode.button(position="top-right"), rx.vstack( # Header rx.heading( "Customer Management", size="8", weight="bold", margin_bottom="2rem", ), # Add Customer Section rx.card( rx.vstack( rx.heading("➕ Add New Customer", size="5", weight="medium"), rx.grid( rx.input( placeholder="Name *", value=State.name, on_change=State.set_name, size="3", ), rx.input( placeholder="Email *", value=State.email, on_change=State.set_email, size="3", ), rx.input( placeholder="Phone", value=State.phone, on_change=State.set_phone, size="3", ), rx.input( placeholder="Address", value=State.address, on_change=State.set_address, size="3", ), columns="4", spacing="4", width="100%", ), rx.button( "Add Customer", on_click=State.add_customer, size="3", variant="solid", color_scheme="blue", width="auto", ), spacing="4", width="100%", ), size="3", width="100%", ), # Spreadsheet Table rx.card( rx.vstack( rx.heading( f"📊 Customer List ({State.customers.length()} total)", size="5", weight="medium", ), rx.box( rx.table.root( rx.table.header( rx.table.row( rx.table.column_header_cell("ID", width="80px"), rx.table.column_header_cell("Name"), rx.table.column_header_cell("Email"), rx.table.column_header_cell("Phone"), rx.table.column_header_cell("Address"), rx.table.column_header_cell( "Actions", width="120px" ), ), ), rx.table.body( rx.foreach( State.customers, lambda customer, index: rx.table.row( rx.table.cell( rx.badge( customer.id, color_scheme="gray", variant="soft", ), ), rx.table.cell( rx.text(customer.name, weight="medium"), ), rx.table.cell( rx.text(customer.email), ), rx.table.cell( rx.text(customer.phone), ), rx.table.cell( rx.text(customer.address), ), rx.table.cell( rx.button( rx.icon("trash-2", size=16), on_click=lambda: State.delete_customer( customer.id ), size="2", variant="soft", color_scheme="red", ), ), align="center", ), ), ), variant="surface", size="3", width="100%", ), width="100%", overflow_x="auto", ), spacing="4", width="100%", ), size="3", width="100%", ), spacing="6", width="100%", max_width="1400px", padding="2rem", ), width="100%", display="flex", justify_content="center", min_height="100vh", background="var(--gray-1)", on_mount=State.load_customers, ) app = rx.App() app.add_page(index)The following features are included in this Customer Data App:
- Add new customers with name, email, phone, and address.
- View a list of all customers in a table format.
- Delete customers from the list.
Run the Reflex app
To run the Reflex app, use the following command in your project directory:
reflex runThis command starts the Reflex development server. You can access the app by navigating to
http://localhost:3000in your web browser.You should see the Customer Data App interface, where you can add, view, and delete customer records stored in your Neon Postgres database.
You can find the complete code for the Customer Data App mentioned in this guide on GitHub.
Need help?
Join our Discord Server to ask questions or see what others are doing with Neon. For paid plan support options, see Support.