


In a production application, internal tooling is often critical for operations and support teams. The Neon Auth Admin plugin (powered by Better Auth) exposes powerful user management APIs directly through the SDK, allowing you to build these tools without writing complex backend logic.
This guide demonstrates how to build an internal admin dashboard using Neon Auth. You will create a React application that allows support staff to view registered users, ban abusive accounts, and securely impersonate users to reproduce bugs. It will cover the following features:
- A user table: To list all registered users in your application.
- Moderation controls: To ban and unban users instantly.
- Impersonation: To log in as any user for troubleshooting purposes.
Prerequisites
Before you begin, ensure you have the following:
- Node.js: Version
18or later installed on your machine. You can download it from nodejs.org. - Neon account: A free Neon account. If you don't have one, sign up at Neon.
Create a Neon project with Neon Auth
You'll need to create a Neon project and enable Neon Auth.
-
Create a Neon project: Navigate to pg.new to create a new Neon project. Give your project a name, such as
admin-dashboard-demo. -
Enable Neon Auth:
- In your project's dashboard, go to the Neon Auth tab.
- Click on the Enable Neon Auth button to set up authentication for your project.
-
Copy your Auth URL:
Found on the Auth page (e.g.,
https://ep-xxx.neon.tech/neondb/auth).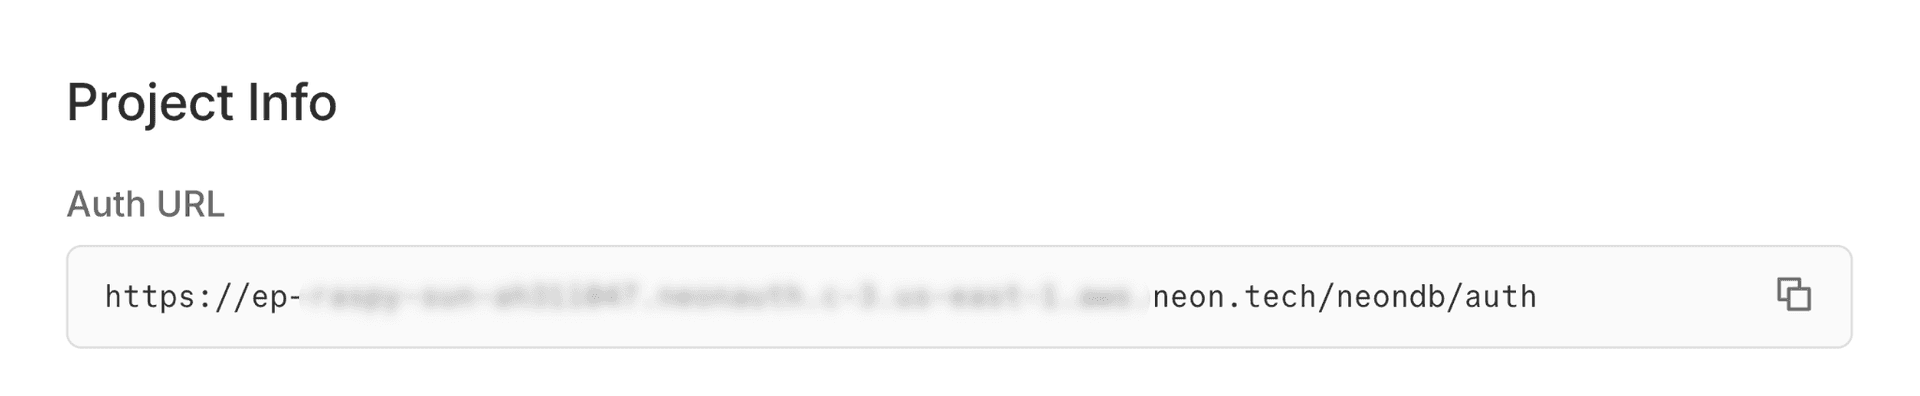
-
Create an Admin user
To use the Admin APIs, you must perform the operations as an authenticated user with the
adminrole. You cannot grant this role via the API initially; you must assign your first admin via the Neon Console.-
Create a user: Go to your application URL or use the Neon Console to create an user (e.g.,
admin@example.com). -
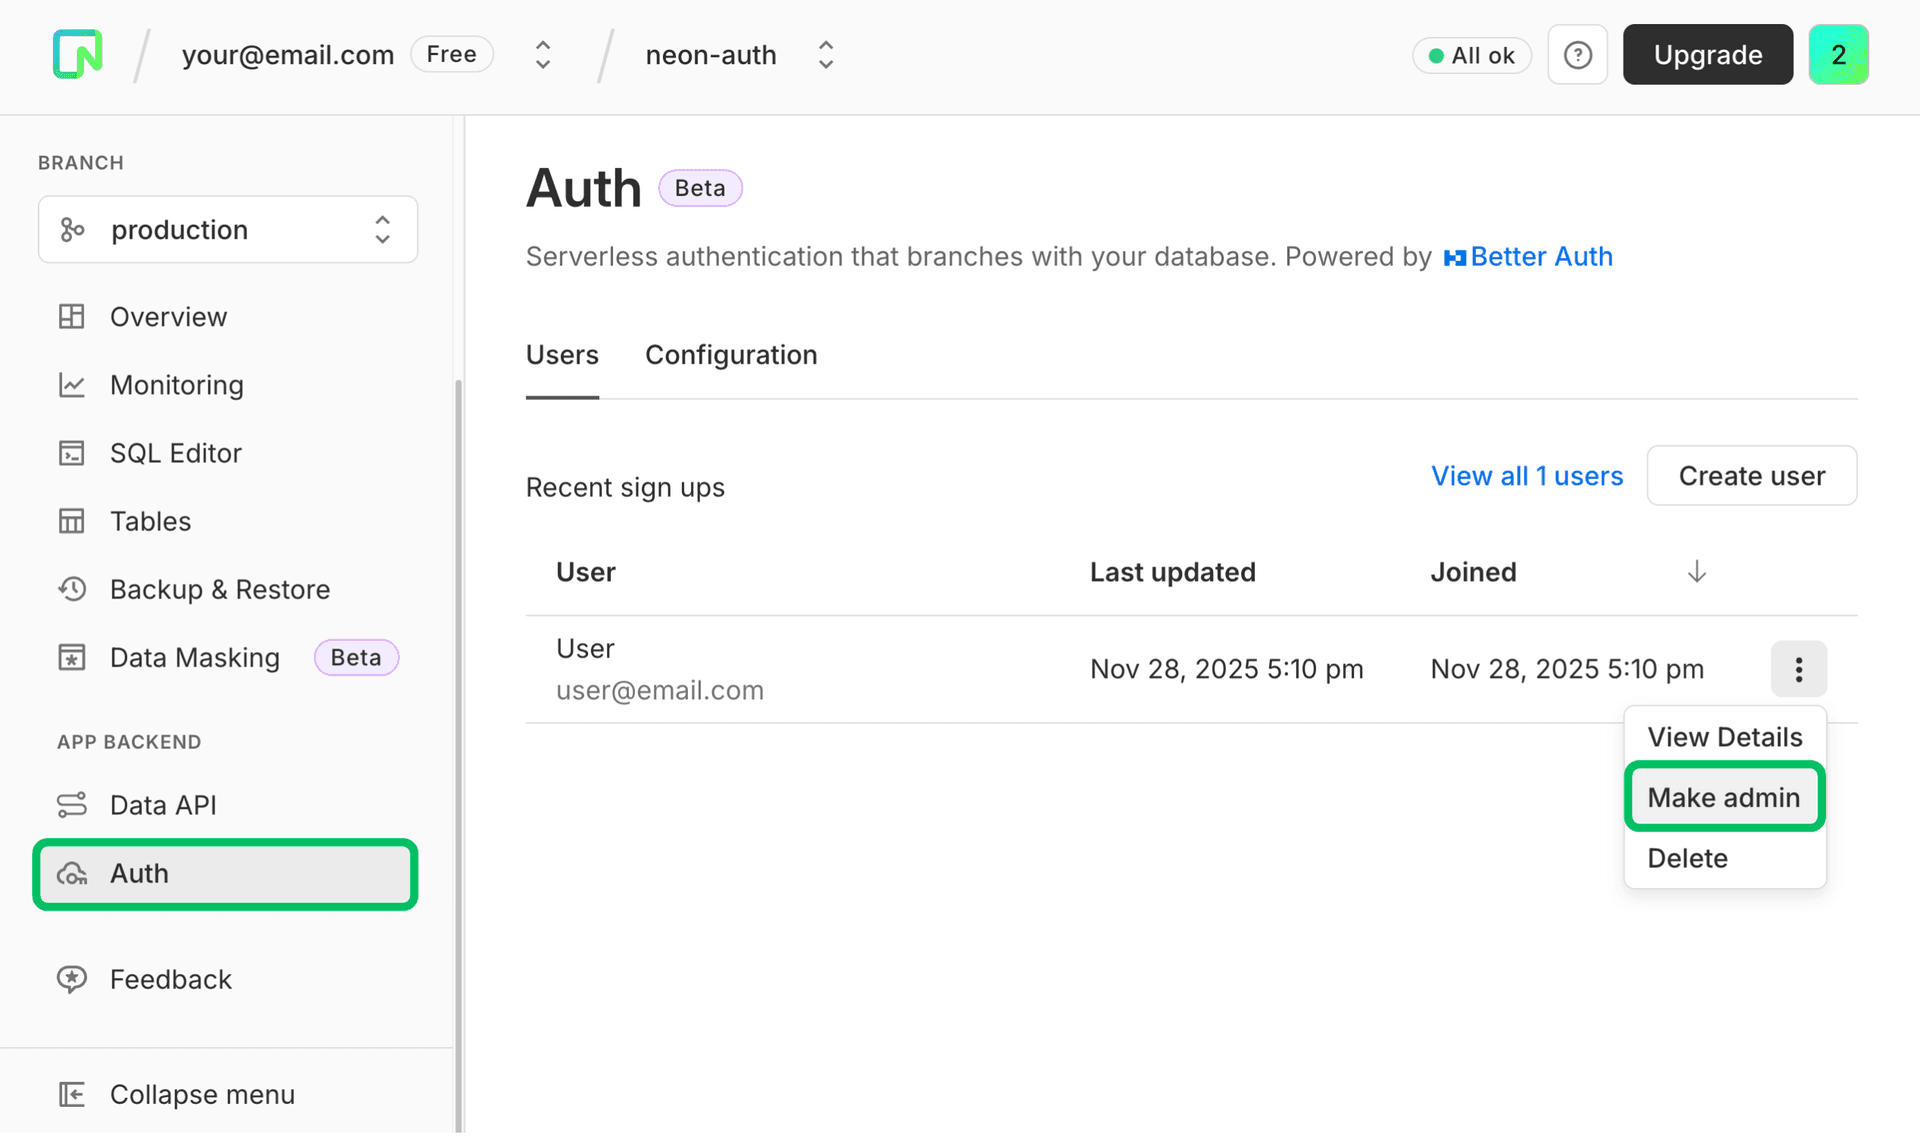
Assign role:
- In the Neon Console, go to Auth -> Users.
- Find your user, click the three-dot menu, and select Make admin.
Now you have an admin user to log in with and access the Admin APIs.
-
Set up the React project
Create a new React project using Vite.
Initialize the app
npm create vite@latest admin-dashboard -- --template react-ts
cd admin-dashboard && npm install
When prompted:
- Select "No" for "Use rolldown-vite (Experimental)?"
- Select "No" for "Install with npm and start now?"
You should see output similar to:
$ npm create vite@latest react-neon-todo -- --template react-ts

> npx
> "create-vite" react-neon-todo --template react-ts

│
◇  Use rolldown-vite (Experimental)?:
│  No
│
◇  Install with npm and start now?
│  No
│
◇  Scaffolding project in /home/user/react-neon-todo...
│
└  Done.
Install dependencies
You will need the following packages for this project:
- Neon SDK:
@neondatabase/neon-jsfor interacting with Neon Auth and the Data API. - React Router:
react-routerfor routing between pages.
npm install @neondatabase/neon-js react-routerSetup Tailwind CSS
Install Tailwind CSS and the Vite plugin:
npm install tailwindcss @tailwindcss/viteAdd the
@tailwindcss/vite pluginto your Vite configuration (vite.config.ts):import { defineConfig } from 'vite'; import react from '@vitejs/plugin-react'; import tailwindcss from '@tailwindcss/vite'; export default defineConfig({ plugins: [ react(), tailwindcss(), ], });Configure environment variables
Create a
.envfile in the root of your project and add the credentials you copied in Step 1:VITE_NEON_AUTH_URL="https://ep-xxx.neon.tech/neondb/auth"Configure Neon Auth client
Initialize the Auth client
Create a client instance to interact with Neon Auth.
Create a file
src/auth.ts. This file will export theauthClientinstance to be used throughout the app.import { createAuthClient } from '@neondatabase/neon-js/auth'; import { BetterAuthReactAdapter } from '@neondatabase/neon-js/auth/react/adapters'; export const authClient = createAuthClient(import.meta.env.VITE_NEON_AUTH_URL, { adapter: BetterAuthReactAdapter(), });Application entry point
Update
src/main.tsxto wrap your app in theNeonAuthUIProviderandBrowserRouterto enable routing and authentication context. TheImpersonationBannercomponent is also included here to display when impersonating a user. The implementation part of this component is covered later in the guide.import { StrictMode } from 'react'; import { createRoot } from 'react-dom/client'; import { BrowserRouter } from 'react-router'; import { NeonAuthUIProvider } from '@neondatabase/neon-js/auth/react/ui'; import App from './App.tsx'; import { authClient } from './auth.ts'; import './index.css'; import { ImpersonationBanner } from './components/ImpersonationBanner.tsx'; createRoot(document.getElementById('root')!).render( <StrictMode> <NeonAuthUIProvider authClient={authClient} emailOTP social={{ providers: ['google'] }}> <BrowserRouter> <ImpersonationBanner /> <App /> </BrowserRouter> </NeonAuthUIProvider> </StrictMode> );Create Auth and Account pages
Neon Auth provides pre‑built UI components for handling the complete flow of authentication, including Sign In, Sign Up, and Account management.
As outlined in the Neon Auth React UI guide, you can use the
AuthViewandAccountViewcomponents to quickly set up these pages.Create
src/pages/Auth.tsx:import { AuthView } from '@neondatabase/neon-js/auth/react/ui'; import { useParams } from 'react-router'; export default function AuthPage() { const { path } = useParams(); return ( <div className="bg-gray-50 dark:bg-gray-900 flex min-h-screen items-center justify-center p-8"> <AuthView pathname={path} /> </div> ); }Create
src/pages/Account.tsx:import { AccountView } from '@neondatabase/neon-js/auth/react/ui'; import { useParams } from 'react-router'; export default function AccountPage() { const { path } = useParams(); return ( <div className="bg-gray-50 dark:bg-gray-900 flex min-h-screen items-center justify-center p-8"> <AccountView pathname={path} /> </div> ); }Update styles
Update
src/index.cssto include the Neon Auth Tailwind styles and set the minimal global styles.@import 'tailwindcss'; @import '@neondatabase/neon-js/ui/tailwind'; :root { font-family: system-ui, sans-serif; line-height: 1.5; font-weight: 400; color: #0f172a; background-color: #f3f4f6; text-rendering: optimizeLegibility; -webkit-font-smoothing: antialiased; -moz-osx-font-smoothing: grayscale; } body { margin: 0; min-height: 100vh; background: #000000; }Implement actions (Ban & Impersonate)
Create a component to render each user row with Ban and Impersonate actions required for the dashboard.
Create
src/components/UserRow.tsxwith the following code:import { useState } from 'react'; import { authClient } from '../auth'; import type { UserType } from './AdminDashboard'; export function UserRow({ user, refreshData }: { user: UserType; refreshData: () => void }) { const [showBanModal, setShowBanModal] = useState(false); const [banReason, setBanReason] = useState(''); const handleBanToggle = async () => { if (user.banned) { await authClient.admin.unbanUser({ userId: user.id }); refreshData(); } else { setShowBanModal(true); } }; const handleConfirmBan = async () => { await authClient.admin.banUser({ userId: user.id, banReason: banReason || 'No reason provided', }); setShowBanModal(false); setBanReason(''); refreshData(); }; const handleImpersonate = async () => { const { data } = await authClient.admin.impersonateUser({ userId: user.id, }); if (data) { window.location.href = '/'; } }; return ( <tr className="hover:bg-gray-50 dark:hover:bg-gray-800"> <td className="p-4 text-gray-900 dark:text-gray-100">{user.name}</td> <td className="p-4 text-gray-900 dark:text-gray-100">{user.email}</td> <td className="p-4"> <span className="bg-gray-100 text-gray-600 dark:bg-gray-800 dark:text-gray-300 rounded px-2 py-1 text-xs font-bold uppercase tracking-wide"> {user.role || 'user'} </span> </td> <td className="p-4"> {user.banned ? ( <span className="bg-red-100 text-red-800 dark:bg-red-900/30 dark:text-red-300 rounded-full px-3 py-1 text-sm font-medium"> Banned </span> ) : ( <span className="bg-green-100 text-green-800 dark:bg-green-900/30 dark:text-green-300 rounded-full px-3 py-1 text-sm font-medium"> Active </span> )} </td> <td className="flex gap-2 p-4"> <button onClick={handleImpersonate} className={`hover:bg-blue-50 border-blue-200 text-blue-600 dark:border-blue-400 dark:text-blue-300 dark:hover:bg-blue-900/30 rounded border px-3 py-1 text-sm font-medium transition ${user.banned ? 'cursor-not-allowed opacity-50' : 'cursor-pointer'}`} disabled={user.banned ?? false} > Impersonate </button> <button onClick={handleBanToggle} className={`bg-red-600 hover:bg-red-700 dark:bg-red-500 dark:hover:bg-red-600 cursor-pointer rounded px-3 py-1 text-sm font-medium text-white transition`} > {user.banned ? 'Unban' : 'Ban'} </button> </td> {showBanModal && ( <td className="fixed inset-0 z-50 flex items-center justify-center bg-black/50"> <div className="dark:bg-gray-900 mx-4 w-full max-w-md rounded-lg bg-white p-6 shadow-xl"> <h3 className="text-gray-900 mb-4 text-lg font-semibold dark:text-white"> Ban User: {user.name} </h3> <label className="text-gray-700 dark:text-gray-300 mb-2 block text-sm font-medium"> Quick select reason </label> <div className="mb-3 flex flex-wrap gap-2"> {[ 'Violated terms of service', 'Free tier abuse', 'Spam or suspicious activity', 'Non payment of dues', ].map((reason) => ( <button key={reason} onClick={() => setBanReason(reason)} className={`cursor-pointer rounded-full border px-3 py-1 text-xs font-medium transition ${ banReason === reason ? 'bg-red-100 border-red-300 text-red-700 dark:bg-red-900/40 dark:border-red-500 dark:text-red-300' : 'bg-gray-100 border-gray-300 text-gray-700 hover:bg-gray-200 dark:bg-gray-800 dark:border-gray-600 dark:text-gray-300 dark:hover:bg-gray-700' }`} > {reason} </button> ))} </div> <label className="text-gray-700 dark:text-gray-300 mb-2 block text-sm font-medium"> Reason for ban </label> <textarea value={banReason} onChange={(e) => setBanReason(e.target.value)} placeholder="Enter the reason for banning this user..." className="border-gray-300 dark:border-gray-600 focus:ring-red-500 focus:border-red-500 dark:bg-gray-800 w-full resize-none rounded-md border px-3 py-2 shadow-sm focus:ring-2 dark:text-white" rows={3} autoFocus /> <div className="mt-4 flex justify-end gap-3"> <button onClick={() => { setShowBanModal(false); setBanReason(''); }} className="text-gray-700 dark:text-gray-300 bg-gray-100 dark:bg-gray-800 hover:bg-gray-200 dark:hover:bg-gray-700 cursor-pointer rounded-md px-4 py-2 text-sm font-medium transition" > Cancel </button> <button onClick={handleConfirmBan} className="bg-red-600 hover:bg-red-700 dark:bg-red-500 dark:hover:bg-red-600 cursor-pointer rounded-md px-4 py-2 text-sm font-medium text-white transition" > Confirm Ban </button> </div> </div> </td> )} </tr> ); }The
UserRowcomponent includes the following functionality:-
State management
showBanModal: Controls whether the ban confirmation modal is visible.banReason: Stores the reason provided for banning a user.
-
handleBanToggle()- If the user is already banned, calls
authClient.admin.unbanUser()to unban them. - If the user is not banned, opens the ban modal to collect a reason.
- Refreshes the user list after changes.
- If the user is already banned, calls
-
handleConfirmBan()- Calls
authClient.admin.banUser()with the user’s ID and the selected or entered ban reason. - Resets the modal state and refreshes the user list.
- Calls
-
handleImpersonate()- Calls
authClient.admin.impersonateUser()with the user’s ID. - If successful, redirects the admin to the homepage (
'/') as the impersonated user.
- Calls
-
Row rendering
- Displays user details: Name, Email, Role, and Status (Active/Banned).
- Shows action buttons:
- Impersonate: Disabled if the user is banned.
- Ban/Unban: Toggles based on the user’s current status.
-
Ban modal
- Appears when banning a user.
- Provides quick‑select ban reasons and a textarea for custom reasons.
This component ensures that admins can manage user accounts directly from the dashboard, with clear UI feedback for banning, unbanning, and impersonating users.
-
Create the user list component
Create a file
src/components/AdminDashboard.tsx. This component will fetch and display the list of users using the Admin API.import { useEffect, useState } from 'react'; import { authClient } from '../auth'; import { UserRow } from './UserRow'; import { RedirectToSignIn, SignedIn } from '@neondatabase/neon-js/auth/react/ui'; import type { User } from '@neondatabase/neon-js/auth/types'; export type UserType = User & { banned: boolean | null } & { role?: string | null }; export default function AdminDashboard() { const [users, setUsers] = useState<UserType[]>([]); const [userDataLoading, setUserDataLoading] = useState(false); const { data, isPending: isSessionDataLoading } = authClient.useSession(); const fetchUsers = async () => { setUserDataLoading(true); const { data, error } = await authClient.admin.listUsers({ query: { limit: 100, sortBy: 'createdAt', sortDirection: 'desc' }, }); if (data) { setUsers(data.users); } else { console.error(error); alert('Failed to fetch users.'); } setUserDataLoading(false); }; useEffect(() => { if (data?.user?.role === 'admin') fetchUsers(); }, [data]); if (userDataLoading || isSessionDataLoading) { return ( <div className="text-gray-600 dark:text-gray-300 flex min-h-screen items-center justify-center"> Loading users… </div> ); } const isImpersonating = data?.session?.impersonatedBy; return ( <div className={`bg-gray-50 dark:bg-gray-900 min-h-screen px-4 py-8 lg:px-8 sm:px-6 ${isImpersonating ? 'pt-20' : ''}`} > <SignedIn> {data?.user?.role === 'admin' ? ( <> <div className="mb-6 flex items-center justify-between"> <h1 className="text-gray-900 text-2xl font-semibold dark:text-white"> Support Dashboard </h1> </div> <div className="border-gray-200 dark:border-gray-700 dark:bg-gray-800 relative overflow-x-auto rounded-lg border bg-white shadow-sm"> <table className="min-w-full text-sm"> <thead className="bg-gray-100 text-gray-700 dark:bg-gray-700 dark:text-gray-200 sticky top-0 z-10"> <tr> <th className="px-4 py-3 text-left font-medium">User Name</th> <th className="px-4 py-3 text-left font-medium">Email</th> <th className="px-4 py-3 text-left font-medium">Role</th> <th className="px-4 py-3 text-left font-medium">Status</th> <th className="px-4 py-3 text-left font-medium">Actions</th> </tr> </thead> <tbody className="divide-gray-200 dark:divide-gray-700 divide-y"> {users.map((user) => ( <UserRow key={user.id} user={user} refreshData={fetchUsers} /> ))} </tbody> </table> </div> </> ) : ( <div className="border-red-400 bg-red-50 text-red-700 dark:border-red-500 dark:bg-red-900/30 dark:text-red-300 mx-auto max-w-lg rounded-lg border p-6 text-center"> <h2 className="mb-2 text-lg font-semibold">Access Denied</h2> <p>You do not have permission to view this page.</p> </div> )} </SignedIn> <RedirectToSignIn /> </div> ); }The
AdminDashboardcomponent includes the following features:-
State management
users: Stores the list of users fetched from the backend.userDataLoading: Tracks whether user data is currently being loaded.authClient.useSession(): Provides session data and loading state for the authenticated user.
-
fetchUsers()- Calls
authClient.admin.listUsers()to retrieve up to 100 users, sorted by creation date (newest first).For detailed guidance on customizing query parameters, enabling partial searches by name or email, and implementing pagination for large user bases, see the Admin API reference
- Updates the
usersstate with the fetched data. - Handles errors by logging them and showing an alert.
- Sets loading state before and after the request.
- Calls
-
useEffect()- Runs when session data changes.
- If the logged‑in user has the role
admin, it triggersfetchUsers()to load user data.
-
Loading state
- If either session data or user data is still loading, displays a “Loading users…” message.
-
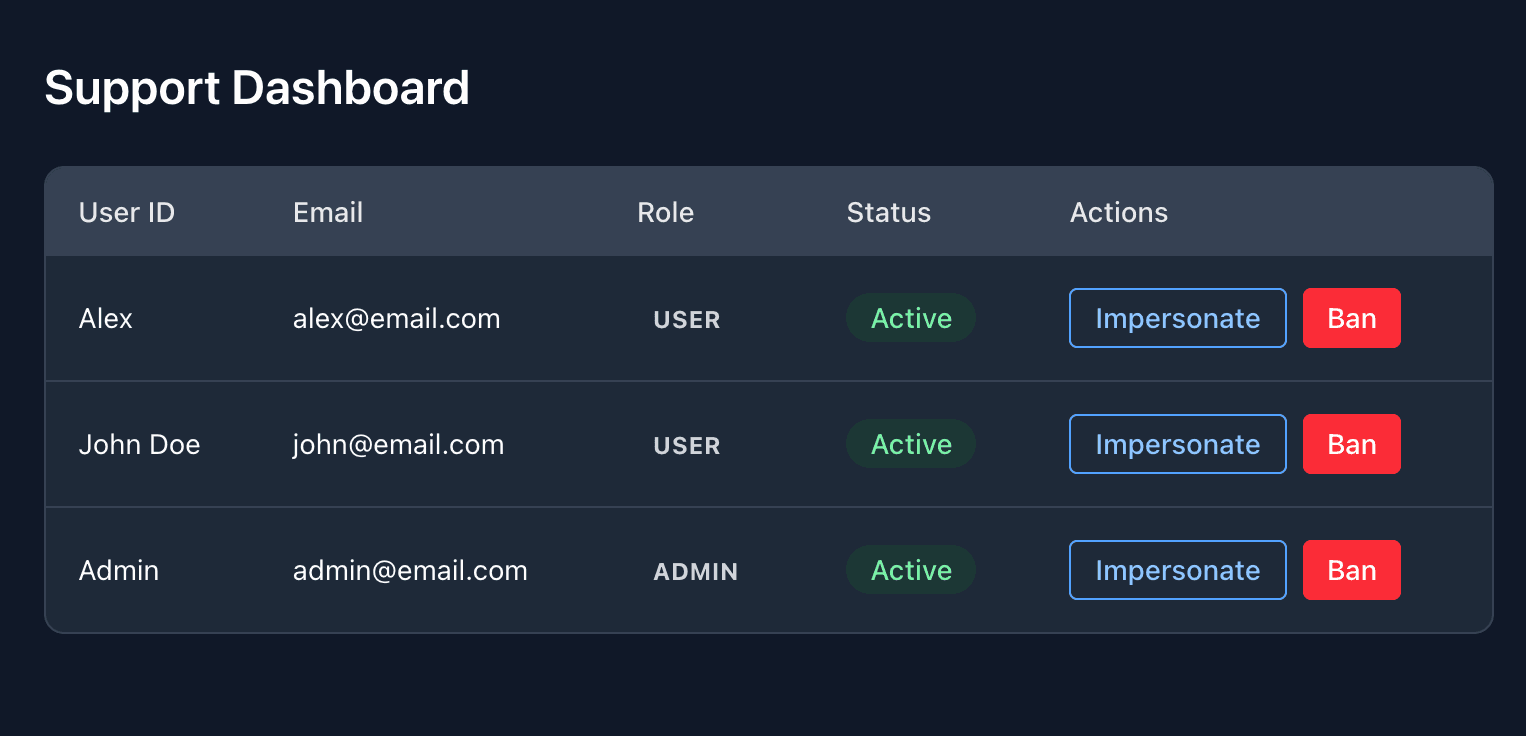
Dashboard rendering
- If the user has the
adminrole:- Displays a Support dashboard header.
- Renders a table of users with columns for User ID, Email, Role, Status, and Actions (using the
UserRowcomponent).
- If the user is not an admin:
- Shows an Access Denied message.
- If the user has the
-
Authentication handling
- Only renders the dashboard for signed‑in users by wrapping the content in
<SignedIn>. - Uses
<RedirectToSignIn>to redirect unauthenticated users to the sign‑in page.
- Only renders the dashboard for signed‑in users by wrapping the content in
-
Add an Impersonation banner
When impersonating a user, it is critical to have a way to return to your admin account. This component checks the session for the
impersonatedByfield on the session object and displays a banner with a button to stop impersonation.Create
src/components/ImpersonationBanner.tsx:import { authClient } from '../auth'; export function ImpersonationBanner() { const { data: session } = authClient.useSession(); // Only render if currently impersonating if (!session?.session.impersonatedBy) return null; const stopImpersonation = async () => { await authClient.admin.stopImpersonating(); window.location.reload(); }; return ( <div className="bg-amber-400 text-amber-900 fixed left-0 right-0 top-0 z-50 flex items-center justify-center gap-4 p-3 font-medium shadow-md"> <span> 👀 You are impersonating <strong>{session.user.email}</strong> </span> <button onClick={stopImpersonation} className="bg-amber-900 text-amber-50 hover:bg-amber-800 rounded px-4 py-1 text-sm font-bold shadow-sm transition" > Return to Admin </button> </div> ); }The
ImpersonationBannercomponent includes the following features:-
Session handling
- Uses
authClient.useSession()to access the current session data. - Checks if the session includes
impersonatedBy. - If not impersonating, the component returns
null(renders nothing).
- Uses
-
stopImpersonation()- Calls
authClient.admin.stopImpersonating()to end the impersonation session and revert to the admin account.
- Calls
-
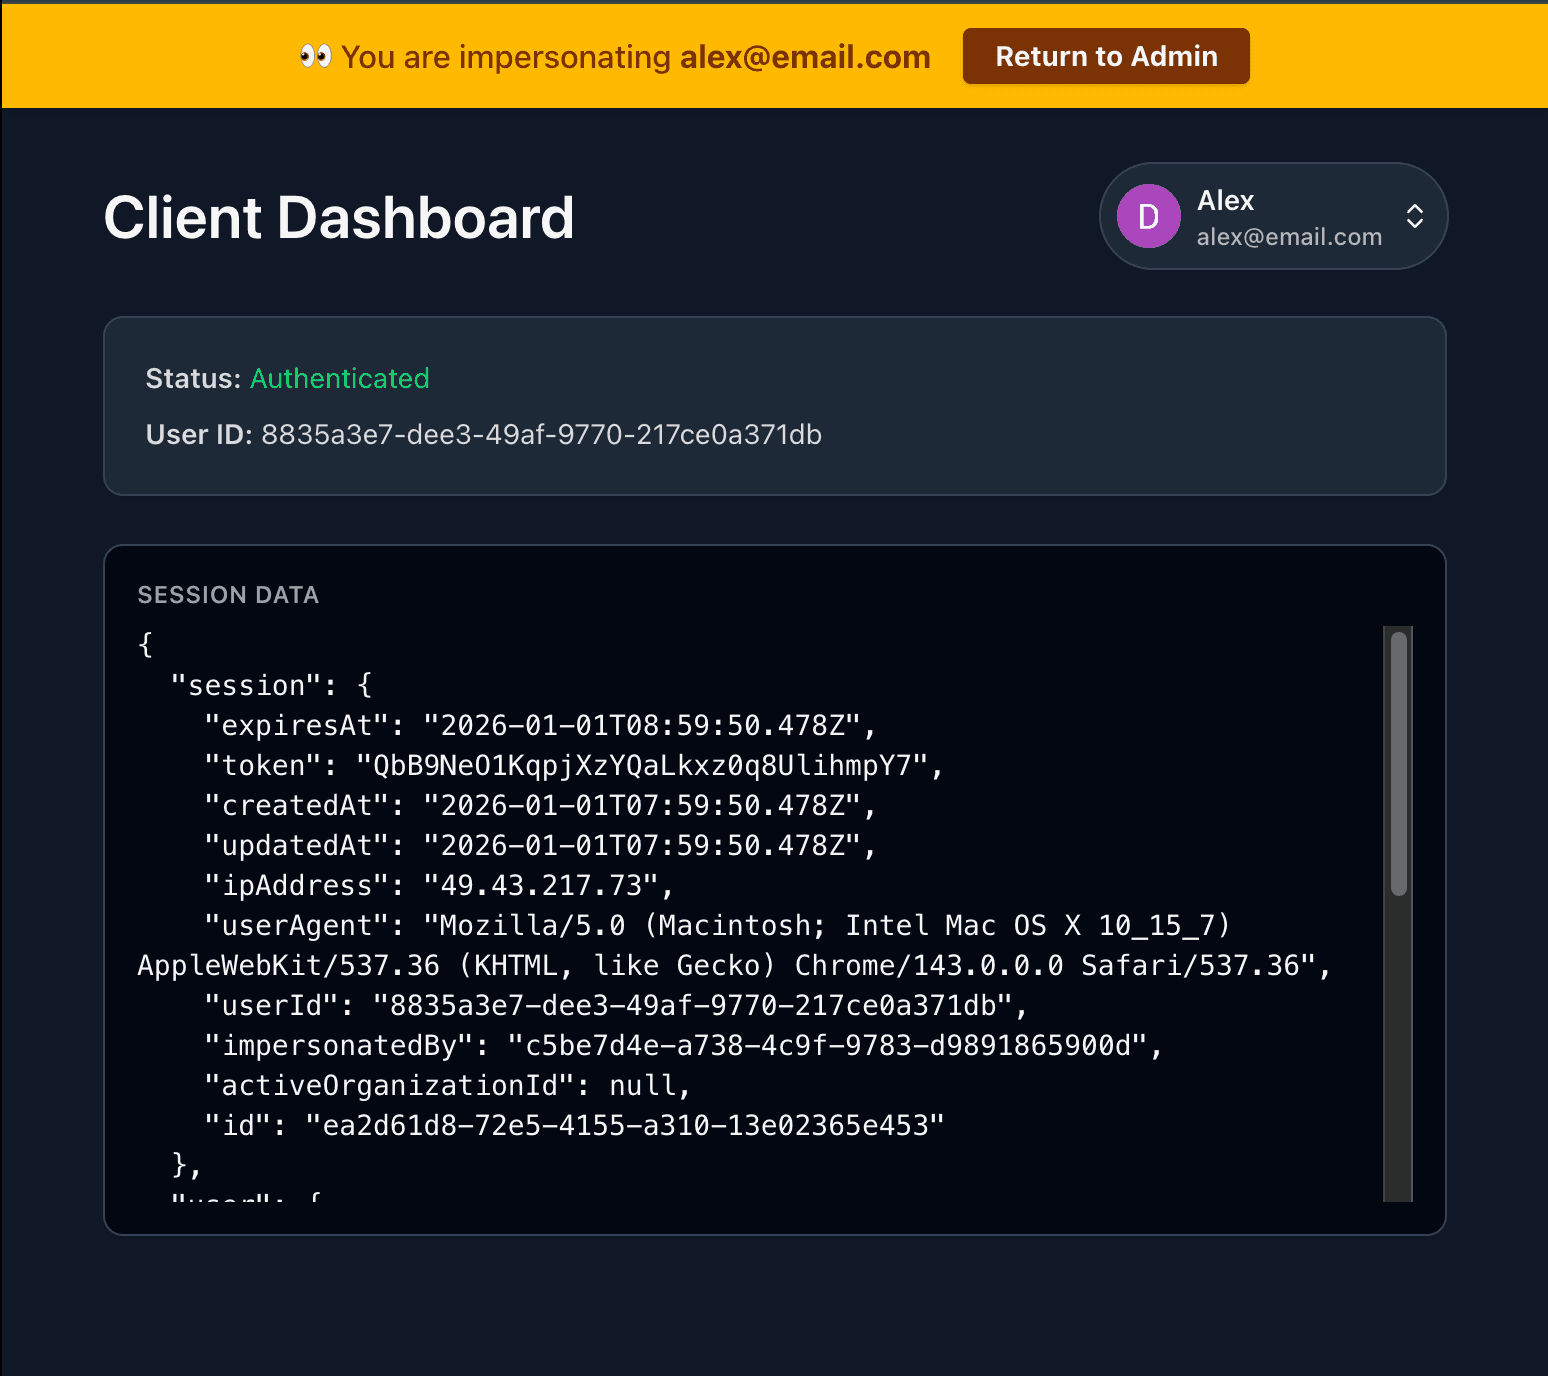
Banner rendering
- Displays a fixed banner at the top of the screen to display the user information being impersonated.
- Includes a Return to Admin button that triggers
stopImpersonation().
This component ensures admins have clear visibility when impersonating a user and provides a quick way to return to their own account.
-
Complete the App component
Finally, update
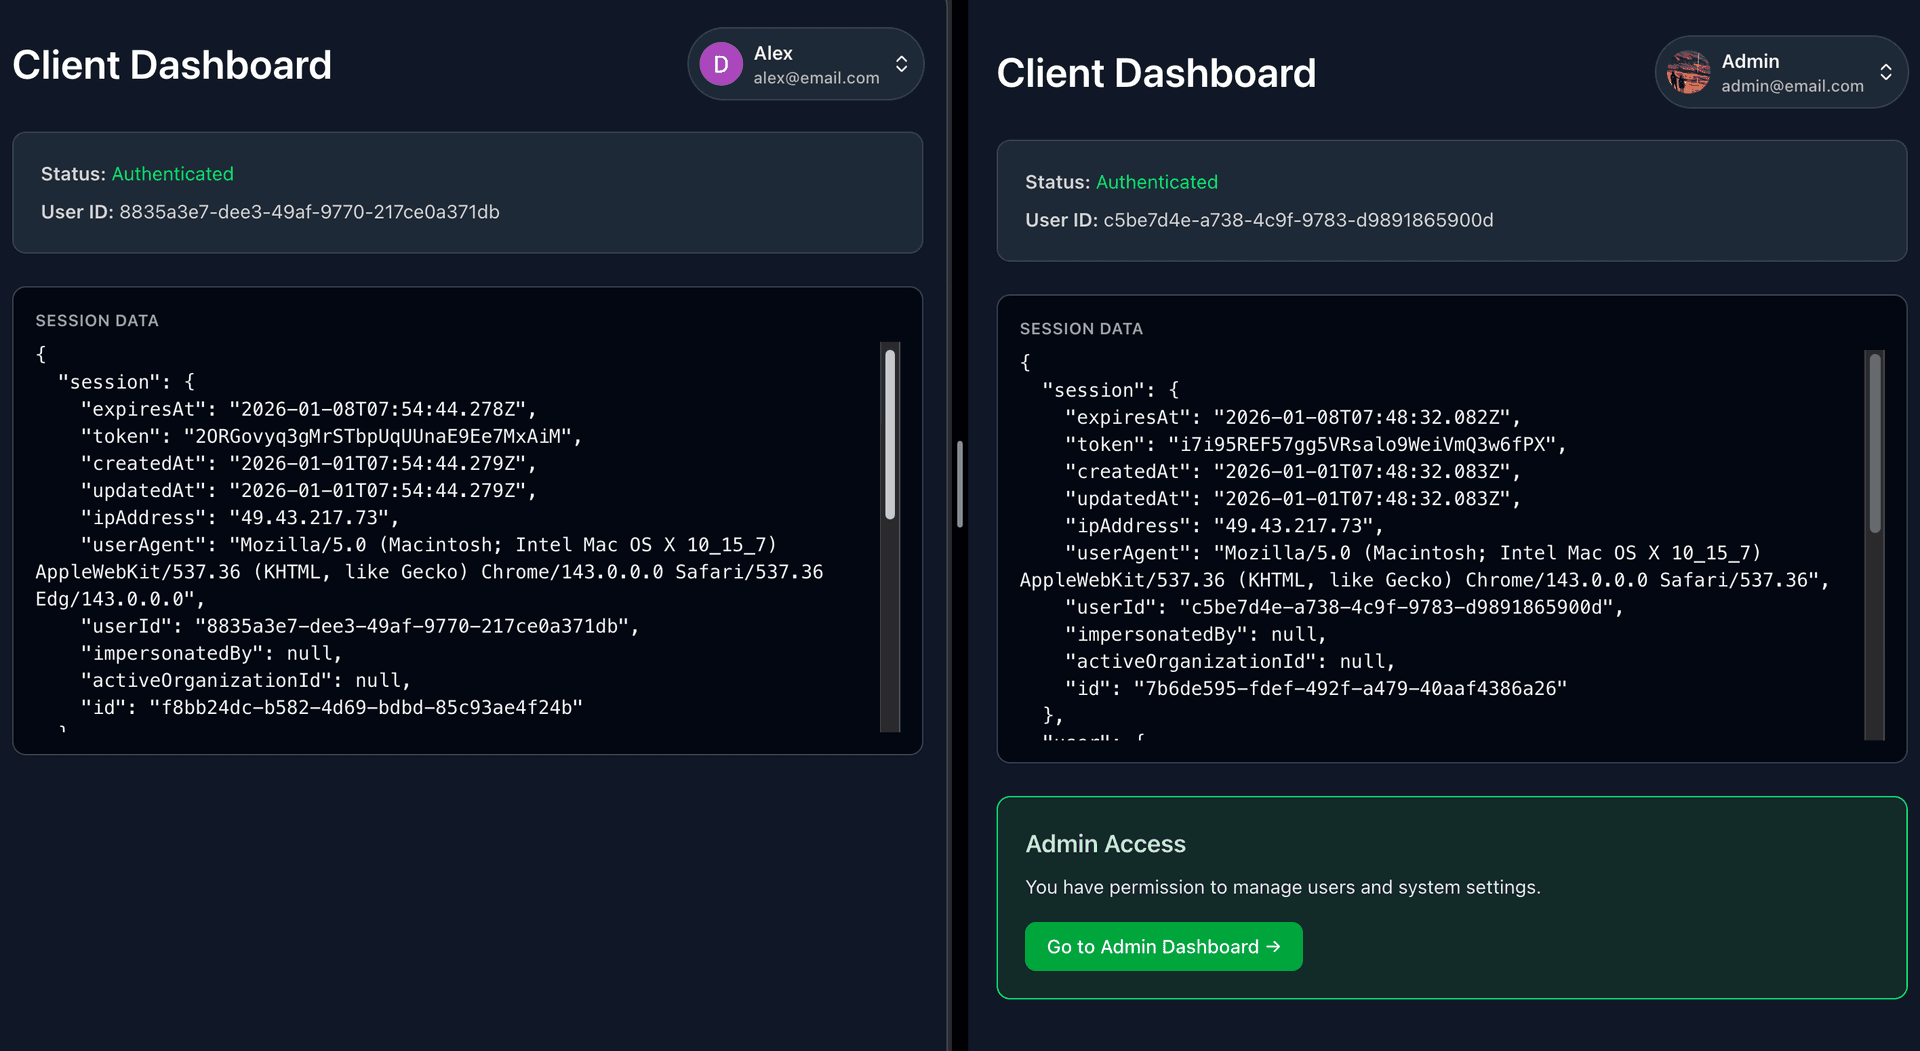
src/App.tsxto include routing and the main dashboard layout.import { RedirectToSignIn, SignedIn, UserButton } from '@neondatabase/neon-js/auth/react'; import AdminDashboard from './components/AdminDashboard'; import { Link, Route, Routes } from 'react-router'; import Auth from './pages/Auth'; import Account from './pages/Account'; import { authClient } from './auth'; const HomePage = () => { const { data, isPending } = authClient.useSession(); const isImpersonating = data?.session?.impersonatedBy; if (isPending) { return ( <div className="text-gray-600 dark:text-gray-300 flex min-h-screen items-center justify-center"> Loading session… </div> ); } return ( <div className={`bg-gray-50 dark:bg-gray-900 min-h-screen px-4 py-8 ${isImpersonating ? 'pt-20' : ''}`} > <div className="mx-auto max-w-2xl space-y-6"> <SignedIn> <div className="flex items-center justify-between"> <h1 className="text-gray-900 text-3xl font-semibold dark:text-white"> Client Dashboard </h1> <UserButton className="bg-gray-100 text-gray-900 hover:bg-gray-200 dark:bg-gray-800 dark:text-gray-100 dark:hover:bg-gray-700 ring-gray-200 dark:ring-gray-700 focus-visible:ring-blue-500 flex items-center gap-2 rounded-full ring-1 transition-all duration-150 focus:outline-none focus-visible:ring-2" /> </div> <div className="border-gray-200 dark:border-gray-700 dark:bg-gray-800 rounded-lg border bg-white p-5 shadow-sm"> <p className="text-gray-600 dark:text-gray-300 text-sm"> <span className="font-semibold">Status:</span>{' '} {data?.session ? ( <span className="text-green-600 dark:text-green-400">Authenticated</span> ) : ( <span className="text-red-500">Guest</span> )} </p> {data?.user && ( <p className="text-gray-600 dark:text-gray-300 mt-2 text-sm"> <span className="font-semibold">User ID:</span> {data.user.id} </p> )} </div> <div className="border-gray-200 bg-gray-950 text-gray-100 dark:border-gray-700 rounded-lg border p-4 text-sm shadow-sm"> <div className="text-gray-400 mb-2 text-xs font-semibold uppercase tracking-wide"> Session Data </div> <pre className="max-h-72 overflow-auto whitespace-pre-wrap break-words"> {JSON.stringify(data, null, 2)} </pre> </div> {data?.user?.role === 'admin' && ( <div className="border-green-500 bg-green-50 dark:border-green-400 dark:bg-green-900/30 rounded-lg border p-5"> <h2 className="text-green-800 dark:text-green-200 mb-2 text-lg font-semibold"> Admin Access </h2> <p className="text-green-700 dark:text-green-100 mb-4 text-sm"> You have permission to manage users and system settings. </p> <Link to="/admin" className="bg-green-600 hover:bg-green-700 dark:bg-green-600 dark:hover:bg-green-800 inline-flex items-center rounded-md px-4 py-2 text-sm font-medium text-white transition" > Go to Admin Dashboard → </Link> </div> )} </SignedIn> <RedirectToSignIn /> </div> </div> ); }; export default function App() { return ( <Routes> <Route path="/" element={<HomePage />} /> <Route path="/admin" element={<AdminDashboard />} /> <Route path="/auth/:path" element={<Auth />} /> <Route path="/account/:path" element={<Account />} /> </Routes> ); }This file defines the main React application with routing and a client dashboard that integrates authentication and admin access:
-
HomePagecomponent- Session handling
- Uses
authClient.useSession()to fetch session data and loading state.
- Uses
- Header
- Displays a "Client Dashboard" title.
- Includes a
UserButtonfor account management (profile, sign out, etc.).
- User and session details
- Shows authentication status and user ID if logged in.
- Renders raw session data for debugging purposes.
- Admin call‑to‑action
- If the user’s role is
admin, shows an “Admin Access” card. - Provides a link to the Admin Dashboard (
/admin).
- If the user’s role is
- Authentication handling
- Uses
<SignedIn>to render content only for authenticated users. - Uses
<RedirectToSignIn>to redirect unauthenticated users to the sign‑in page.
- Uses
- Session handling
-
Appcomponent: The main application component that sets up routing usingreact-routerwith the following routes:/→HomePage/admin→AdminDashboard/auth/:path→Authpage/account/:path→Accountpage
This setup provides a client dashboard that shows session details, user status, and admin access, while routing users to authentication, account, and admin pages as needed.
-
Run the application
-
Start the development server:
npm run dev -
Open
http://localhost:5173in your browser. -
In a separate browser or incognito window, create some test user accounts by signing up.
-
In the original browser window, log in with the account you assigned the admin role to in Step 2.
-
You should now see the dashboard populated with user accounts.
-
Return to the admin dashboard, where you can list, ban, and impersonate users.
-
Try impersonating the user. The app will switch to their perspective, allowing you to debug issues they may encounter.
-
The Go to Admin Dashboard link is only visible to users with the
adminrole and provides quick access to the admin interface.
-
Use cases for impersonation and admin tools
While this demo app simply shows the impersonated user’s information and session details, in a production application impersonation and admin tools can be far more powerful and useful. They enable support teams, moderators, and operations staff to manage accounts effectively and resolve issues quickly. Common scenarios include:
- Customer support & debugging: Admins can impersonate a user to reproduce bugs, troubleshoot login issues, or verify account settings exactly as the user sees them. This eliminates guesswork when a user reports a problem that only occurs on their account.
- Billing & subscriptions: Support staff can impersonate a user to confirm subscription status, payment history, or upgrade/downgrade flows.
- Feature access & permissions: Admins can check whether a user has the correct role‑based permissions or feature entitlements, ensuring access policies are applied correctly.
- Onboarding assistance: Support teams can walk through the app as the user to confirm onboarding steps are completed properly.
- Trust & safety: Moderators can use the Ban functionality to revoke access for users posting spam or violating terms of service, preventing future logins.
- Back‑office operations: Operations managers can view user details, confirm email addresses, or audit user roles directly from a UI instead of running manual SQL queries.
Source code
The complete source code for this example is available on GitHub.
Resources
- Neon Auth Admin API Reference
- Neon Auth Overview
- Neon Auth UI components
- React with Neon Auth UI (UI Components)
- Neon Auth & Data API TypeScript SDKs
Need help?
Join our Discord Server to ask questions or see what others are doing with Neon. For paid plan support options, see Support.